

Home Update: Laundry Room Stalemate, Living Room Refresh, and Life with Two Dogs

Click the photo to check out the YouTube version of this blog post
Hey y’all! Welcome back to Keepin’ Up with KJ. If you’ve been following my journey, you know that I’ve been transforming my first home one DIY project at a time. And let me tell you—there’s been a lot going on lately… and a lot NOT going on, all at the same time. From my never-ending laundry room makeover to a potential living room refresh and adjusting to life with two dogs, I’ve got some updates to share. Let’s get into it!
Laundry Room: A Year-Long Stalemate
My laundry room project has been in the works for over a year now, and honestly, I feel like I’ve hit a wall. Last spring, I partnered with LG to receive a washer-dryer combo unit that I absolutely love. That sparked my idea to create a built-in look with a countertop and upper cabinets for storage.
I even found some discounted cabinets at Lowe’s and painted the space, but here’s the issue—I’m not in love with the cabinets OR the color I chose. Since my kitchen and laundry room are connected, I feel like I need to finalize my kitchen renovation plans before committing to cabinets in the laundry room. And, well… since I haven’t figured that out yet, the laundry room has been at a standstill.
At this point, the project just isn’t exciting me anymore, which is why it’s been on pause. But who knows? Maybe inspiration will strike soon!
Living Room Refresh: Inspired by a DIY Fail
Now, what HAS been exciting me lately is the idea of refreshing my living room! And funny enough, it all started because of a DIY fail. Yep, my most viral video ever? A total fail.
One of my first projects was an IKEA Kallax hack where I built a floating TV stand. But here’s the problem—I didn’t add any bottom support. I just secured it with L-brackets, and now, it’s sagging. It looks awful, and I’m officially over it.
So, I’m scrapping the floating TV stand and replacing it with a dark wood console that will add some much-needed contrast to my space. I also want to bring in more color since my current setup is very white-on-white.
I created a mood board for the new design, which includes:
A light-colored L-shaped couch (slightly nervous about this with two dogs, but the cushion covers are machine washable, so we’ll see!)
A dark wood TV console to replace the old floating unit
Black accent artwork to add depth
A dark walnut coffee table that will complement my dining table
New chairs (maybe) to match the wood tone, but I might keep my current black ones for now
More greenery to warm up the space
Wallpaper that I’ll use to create a beautiful stairway backdrop
I’m still debating a few things, like whether I should switch out my dining chairs or keep them, but overall, I’m excited about this refresh!

Life with Two Dogs: Adjusting to the Chaos
Let’s talk about the REAL transformation happening in my home—life with two dogs! Roux is now four months old, and he’s definitely keeping me on my toes. His crate and playpen are still set up in the living room, which means my dream aesthetic has to work around his setup for now.
I also want to wait until he’s fully grown before investing in a more permanent crate cover, but for now, I’m just rolling with it. If parents can have baby gates all over their house, I can have a dog playpen, right?
Final Thoughts: Embracing the Journey
As much as I love DIY and home projects, this journey has reminded me that you don’t have to do everything at once. I’ve been in my home for almost four years now, and even though I transformed my living room when I first moved in, my style has evolved. And that’s okay!
Home isn’t just about aesthetics—it’s about making a space work for you as you grow and change. So if you’re feeling stuck on a project, don’t stress. Take your time, find what excites you, and know that it’s perfectly fine to refresh your space as your needs shift.
If you want to keep up with my DIY projects and home updates, be sure to subscribe to my YouTube channel and follow along on Instagram. And let me know in the comments—what do you think of my living room mood board? Should I switch up my dining chairs or keep them? I’d love to hear your thoughts!
Until next time, happy DIY-ing!
- Kanisha | Keepin’ Up with KJ

Galentine’s Girls Night In!
“We had a time last night”
IYKYK lol that is one of my favorite TikTok sounds to date!
I wasn’t sure if I was going to host this event again this year but I’m so glad my girls talked me into it. Because this year’s Galentine’s Day Girls Night In was definitely a success. Hosting at home can get stressful but I love being able to create memories with my loved ones. I really didn’t have a theme just a vision I created and turned into a mood board, using Pinterest of course! I wanted the photos from the event to be mood board worthy. So I wanna know what yall think?

My inspiration mood board

Turning my event into a mood board
Did I accomplish my goal?
Now I have be a little bias lol but I absolutely love the mood board I was able to create using my own photos! I will be sharing all of Galentine’s Day content so be sure to subscribe below because I am officially in my hosting era!

Tips for Hosting Memorable Events at Home
Hey y’all, welcome back to Keepin’ Up with KJ! I am trying to really dive into my hosting era and start having more events at home. Because let’s face it, Raven Elyse is literal hosting goals! Today, I’m sharing my top tips for hosting unforgettable events at home. Whether it’s a small gathering or a festive celebration, these tips will help you create a vibe that your guests won’t stop talking about.
1. Set the Mood with Invitations
The invitation is the first impression of your event. It sets the tone, lets guests know what to expect, and provides all the essential details. I love creating my invitations using Canva. It’s super user-friendly, with templates for every occasion that you can personalize to match your theme. Whether you’re hosting a brunch, game night, or themed party, a thoughtful invitation goes a long way in building excitement.

For last year’s Galentine’s Day event, I searched for "Galentine’s Day invites" and customized a design to fit my vision.
2. Decor on a Budget
Decor sets the scene and creates an inviting atmosphere, but it doesn’t have to break the bank. Here’s how I approach decor:
Get Inspired: Pinterest is my go-to for gathering ideas and visualizing the aesthetic for my events.
Photo-Worthy Backdrop: Create a fun photo spot for guests to capture memories. For my Galentine’s Day girls' night, I set up a simple tic-tac-toe-inspired balloon wall using Amazon balloons. It was a hit!
Floral Arrangements: Flowers add an elegant touch. I buy individual bouquets from Trader Joe’s and arrange them myself. For about $36, I created several stunning arrangements.
Invest in Reusable Pieces: Opt for neutral-colored trays, tableware, and decor that you can repurpose for future events. This saves money and keeps your hosting stash versatile.


3. Food & Drinks That Delight
Keep your menu simple but cohesive. Here are some ideas to elevate your offerings:
Choose a Theme: A themed menu ties everything together. For my Galentine’s Day brunch, I served chicken and waffles, fresh fruit, and mimosas.
Signature Drinks: Add a personal touch with a specialty drink. I made a "Love Bug" cocktail with a recipe I found on TikTok. For extra flair, I used heart-shaped ice cubes and edible glitter—small details that wowed my guests.
Make It Easy: Finger foods are great for casual events. And don’t forget to consider dietary preferences or restrictions when planning your menu.


4. Plan Activities to Keep Guests Engaged
The right activities can take your event from good to great. Here are some ideas based on what worked for me:
Creative Competitions: For Galentine’s Day, I hosted a gingerbread decorating competition with themed kits from Target. It brought out everyone’s competitive side and was so much fun!
Game Night Fun: We played Taboo Uncensored, which had everyone laughing and bonding. Games are a great way to break the ice and keep energy levels high.
Gift Exchanges: Instead of traditional party favors, consider a gift exchange. I hosted a "pink elephant" (a Galentine’s twist on white elephant) with a $20 limit. Guests loved the thoughtful gifts, and it relieved me of the pressure to provide party favors.

Ginger Bread House Contest
This ginger bread house competition got a lot more competitive than I planned lol

“Pink” Elephant Gift Exhange
Set a price, upon arrival everyone picks a number. Start with the highest number and go backwards. Each gift can be stolen no more than twice. Happy gifting!
Bonus Tip: Add Personal Touches
Personal touches make your guests feel extra special. For my Galentine’s event, I wrote handwritten notes to each guest, sharing what I love about them. It’s these thoughtful details that leave a lasting impression.

Ready to Host?
Hosting at home can be so rewarding. With the right planning, your events will become cherished memories for you and your guests. Have a theme or hosting idea you’re excited about? Let me know in the comments—I’d love to help you brainstorm! And if you’re ready to dive into your hosting era, don’t forget to like and subscribe to Keepin’ Up with KJ for more tips and inspiration.
Here’s to creating events your guests will always remember!

How to DIY Floating Shelves
Hey y’all! My linen closet was well overdue for a makeover, so I decided to get rid of those white wire racks and build my famous DIY floating shelves. Well technically they aren’t famous this is just the 4th time I have done this project, so I feel like I have finally mastered this DIY! This project can be done in any small closet type space. So if you’re ready to transform your linen closet follow this step by step tutorial which includes a video tutorial down below!
Materials
Click the link above to shop this supply list!
Lumber:
-1/2x2x2ft Select Pine
-1/2x2x3ft Select Pine
-1/2x3x3ft Select Pine
-1/2x4ftx8ft Maple Sanded Plywood
Tools:
-Circular Saw
-Kreg Rip Cut Jig
-Brad Nailer
-Impact driver
Misc.
-Screws
-Brad Nails
-Stainable Wood Filler
-Drywall anchors
-Stain of your choice (I used Minwax Wood Finish Oil Stain Oil-based Natural Semi-transparent Interior Stain in the color Natural)
-Stud Finder
-Laser Level
Step 1: Remove the Wire Racks
Before installing floating shelves, you’ll need to remove any existing wire racks. Here’s how:
Empty the Area: Clear off all items from the wire racks.
Unscrew the Hardware: Using a drill or screwdriver, carefully remove the hardware and screws holding the wire racks in place.
Patch Holes: Fill any leftover holes with spackle, let it dry, and sand it smooth. This will give your walls a clean slate.
Step 2: Plan Your Shelving Layout
Once the space is empty and the holes are filled, determine how many shelves you want and their placement. Use a measuring tape and laser level to mark the locations on the wall for each shelf.
Step 3: Cut and Install the Cleats
Cut the Cleats: Measure and cut the cleats to the desired size. Cut 3 per shelf including the back and both sides.
Locate Studs: Use a stud finder to locate studs. If no studs are present in the desired locations, plan to use drywall anchors.
Install the Cleats: Use a laser level to ensure alignment. Predrill holes through the cleats using an impact driver. This helps perfectly align screws or drywall anchors when securing the cleats to the wall.
Secure the Cleats: Drill all three cleats for each shelf into the wall, ensuring they are level and sturdy.


Step 4: Cut and Fit the Shelf Tops
Measure and Cut: Use a home improvement store’s cutting service or a Kreg Rip-Cut Jig to cut the plywood to size. If the space is not square, refer to this video tutorial to help you make more accurate cuts.
Attach the Tops: Place the cut wood onto the cleats.

Step 5: Attach the Shelf Fronts
Brad Nail the Fronts: Use a brad nailer to attach the front pieces to the shelves. If you don’t own a brad nailer, consider renting one.
Fill Nail Holes: Mix a small amount of water with stainable filler to help it blend seamlessly with the wood. Fill in the nail holes and let it dry.
Step 6: Sand and Stain the Shelves
Sand: Smooth the surfaces and edges with 220 grit sandpaper to prepare them for staining.
Stain: Apply your desired stain color, ensuring even coverage. Allow the shelves to dry completely before styling them.
Step 7: Style and Enjoy!
Once the shelves are installed and finished, it’s time to decorate! Arrange your favorite books, plants, or decorative items to showcase your style.

This project is a great way to jumpstart your DIY projects for 2025.
And remember you can make a big impact on your home just 1 DIY project at a time!
With love and a little paint splatter,
Kanisha
3 Must-Have Amazon Products to Transform Your Linen Closet

Hey, y’all! If you’re anything like me, keeping your linen closet organized can feel like a never-ending task. It’s so easy for those bed sheets, pillowcases, and extra blankets to become a jumbled mess. But don’t worry—I’ve got you covered! I recently gave my linen closet a glow-up with three amazing Amazon finds, and I’m here to share the details so you can do the same.
Whether you’re working with a large closet or a tiny shelf, these products will help you create a space that’s organized, functional, and dare I say... beautiful!
1. Foldable Bed Sheet Set Organizers
Product: 4 Pack Foldable Bed Sheets Set Organizers with Window (Beige)
Let’s talk about game-changers. These foldable linen organizers are perfect for storing your king- and queen-sized sheets. The beige fabric gives them a clean, neutral look, and the clear window on the front makes it easy to see what’s inside without tearing through your whole closet.
Pro Tip: Use one organizer for each bed in your home. I label mine with the room name (Guest Room, Master Bedroom, etc.) so I always know exactly where to find the right set. Bonus? They keep your sheets dust-free and neatly folded.
2. LED Closet Lights with Motion Sensors
Product: LED Closet Light with Charging Station, 6-Pack
Who says your linen closet can’t have a little luxury? These rechargeable LED lights are an absolute must-have for dark closets. They stick anywhere, are motion-activated, and come with a remote control so you can adjust the brightness.
I installed one light on each shelf of my closet, and now I can actually see what I’m grabbing—even at night. These lights are not only functional but also add a sleek, modern vibe to your space.
3. Underbed Storage Boxes
Product: StorageWorks Underbed Storage Box, 2-Pack (Ivory White)
For those extra linens you don’t use every day—think seasonal comforters, extra throw blankets, or guest bedding—these underbed storage boxes are perfect. They have a sturdy structure and ultra-thick fabric that feels super high-quality, plus the ivory white color blends in seamlessly with most decor.
What I love most is their versatility. If you’re short on linen closet space, just slide these under the bed, and you’ve instantly freed up room without sacrificing accessibility.

Make a Big Impact with a Small Budget
Room Transformations Under $100 with Paint
Have a room that feels a bit…blah? With just $100, you can make an incredible transformation that feels like a mini-makeover without the commitment or cost of a full renovation. Paint is one of the most versatile and affordable tools in a DIYer’s toolbox, and it’s a great way to bring out your inner creativity. Whether you’re looking to make a statement or create a more calming atmosphere, paint can be your go-to. Here’s how to tackle a budget-friendly room refresh with some creative paint ideas and tips for making the most out of every dollar!

1. Choose Your Color Wisely
A little color can go a long way! The first step is picking a color that fits the mood you want to create. Cool tones (like blues and greens) can give a space a calm and tranquil vibe, while warm tones (yellows, oranges, and reds) add energy and excitement. Neutrals are perfect if you’re going for something timeless and versatile. When in doubt, grab some paint chips online, like Valspar’s paint chip delivery service (so convenient!) to get a feel for how the color would look in your space.
2. Color Drench the Room
If you’re looking for an all-over refresh, try color drenching! This technique is all about covering the walls, trim, and even the ceiling in the same shade to create a cozy, enveloping effect. By using the same color throughout, the space will feel more cohesive, and the boundaries of the room are softened—this trick can even make small spaces feel larger! Plus, with just one gallon of paint, you should have enough to cover an average-sized room or a small bathroom, like the half-bathroom I recently revamped.

3. Add an Accent Wall
Not ready to go all-in? An accent wall might be your answer. Painting just one wall can give the room a pop of personality without feeling overwhelming. It’s also a great way to introduce bold or deep colors, which might seem too intense for the entire room. When doing an accent wall, think about the wall you’d like to highlight—maybe the one behind your bed, your sofa, or even around a fireplace.
4. Get Creative with Shapes and Patterns
This is where you can have a lot of fun! Geometric shapes, stripes, or even a half-painted wall can add character to your space. Using painter’s tape, you can create clean, bold lines for patterns that make a statement without breaking the bank. Try a simple color-blocked pattern or a scalloped edge for a playful twist! The key here is to embrace your creativity and use the paint you have to create something truly unique.
5. Don’t Forget the Furniture and Accessories
Paint isn’t just for walls! If your furniture feels outdated, consider giving it a new look with a fresh coat. You can paint wooden furniture pieces like bookshelves, side tables, or chairs to tie them into the room's color scheme. Don’t overlook accessories either; a quick coat of paint on picture frames, flower pots, or lamp bases can pull everything together for a unified look.
6. Maximize with Supplies You Already Have
To keep costs down, use supplies you may already have on hand, like paint rollers, painter’s tape, and drop cloths. If you’re starting from scratch, you can usually pick up essentials at your local hardware store or even grab a small paint kit from your favorite online shop.

Budget Breakdown
To make sure you stay within the $100 limit, here’s a quick budget guide:
1 Gallon of Paint: $40-60 (one gallon is usually enough for about 350 square feet)
Painter’s Tape: $5–$8
Paintbrushes/Rollers: $18.98 Valspar Walls, Ceilings and Trim+ 8-Piece Microfiber Paint Roller Kit
Drop Cloth: $3 (or repurpose an old sheet)
Total: Approximately $90
If you are looking to invest in a platform ladder, it will definitely help to reach those high areas without climbing up and down a traditional ladder
Before You Go: Tips for the Best Results
Prep your walls by cleaning and patching any holes or scuffs to ensure the paint applies evenly.
Prime your surfaces if you’re covering a dark color with a light one (or vice versa) for the best results.
Sample first by painting a small area and seeing how it looks in different lighting.
And there you have it! With just $100, you can change the entire feel of a room and bring it to life with a fresh coat of paint. What room will you transform next? Let me know in the comments, or tag me on social media @keepinupwithKJ_DIY to show off your DIY transformations!

Must Have For All Painting Projects!
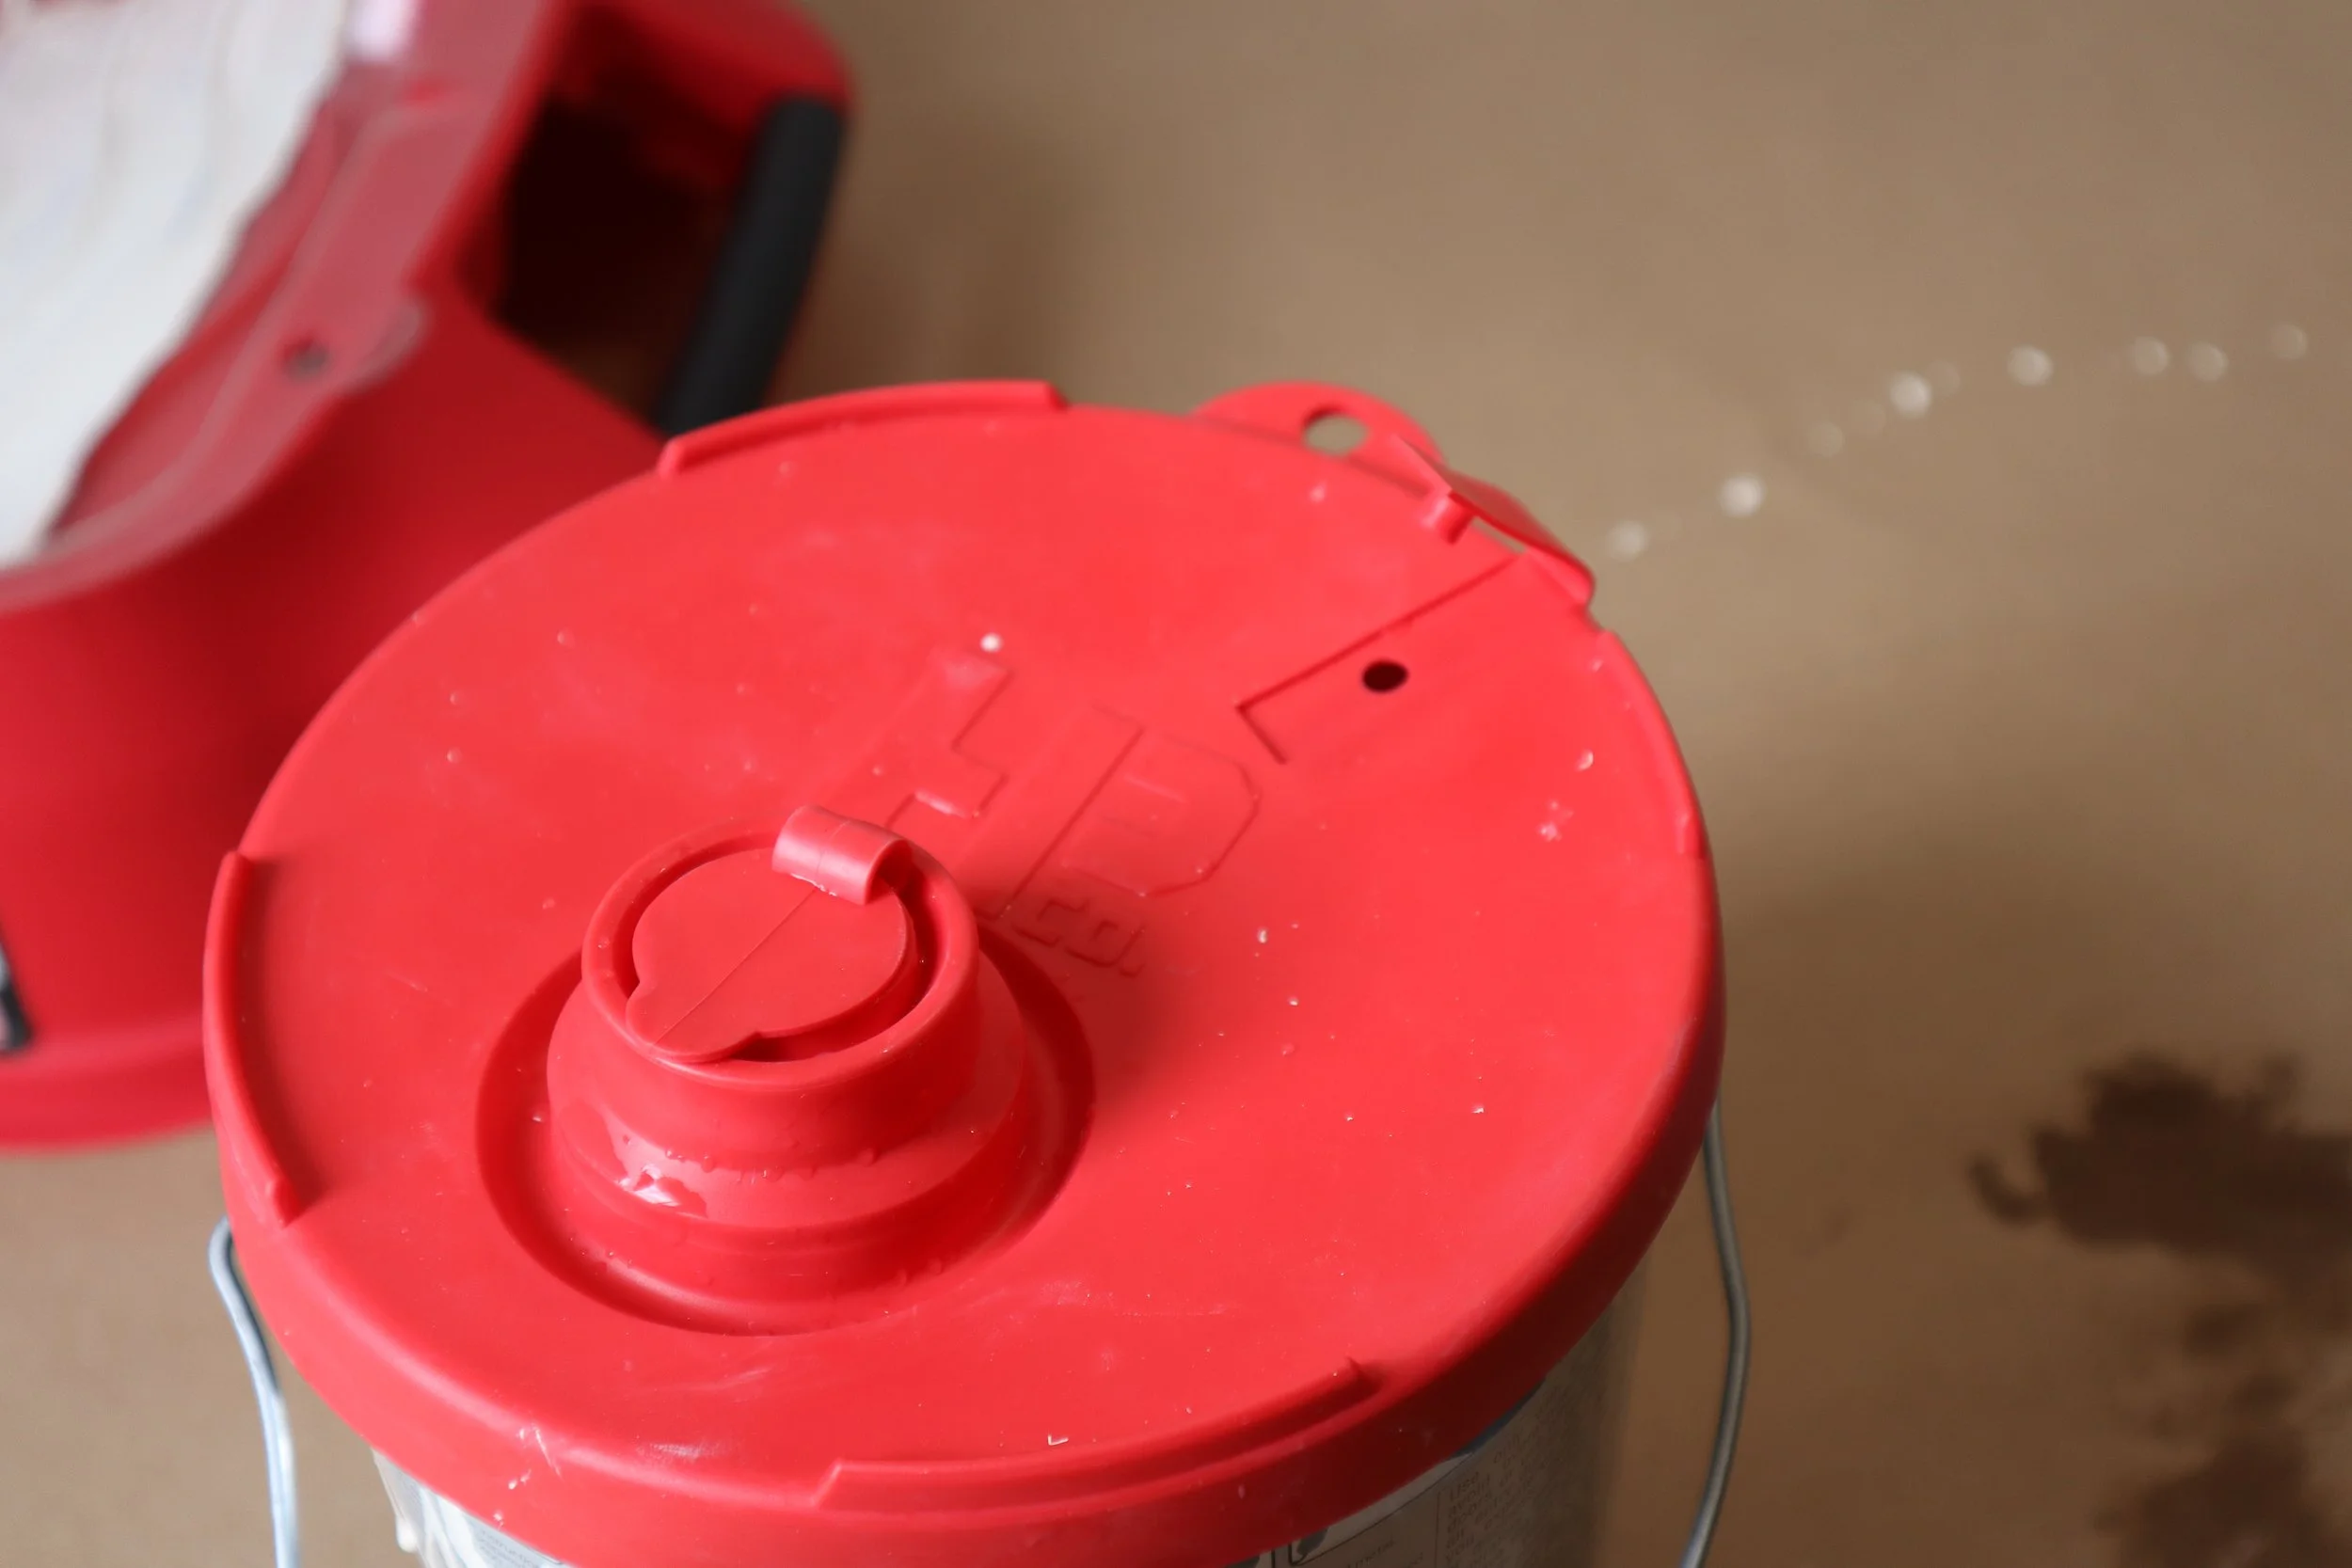
When I first bought my home 3 years ago, I knew I would have to repaint every room. The colors did not match the vibe I wanted in my home. And even though I had experience painting growing up, helping my mom around the house I wanted to make sure I had the right tools to make the job easier while ensuring a professional finish. That’s when I found the Handy Paint Pail!
The Handy Paint Pail is perfect for cutting in edges and corners with brush. The magnetic tab ensures your wet paint brush doesn’t get lost in the paint or fall out of your pail. What you love most is how easy it is to clean because you simply dispose of the liners and you’re ready to go for your next paint project.
What I didn’t know was that there was an entire line of Handy Products! All available to give every painter a hand.

For my laundry room makeover the first step was of course a fresh coat of paint! With my Handy Paint Products I was able to get this paint job and clean up done in no time.
I am a Lowe’s girlie but be sure to CLICK HERE to see where you can purchase your Handy Products today!
Thank you to Handy Products for Sponsoring this post


2024 Home Goals | Leaf Home
2024 is in full swing and have a lot planned for my “ugly house” this year. Now that the guest bedroom is complete I am ready to get started on my next project but it's really important to plan and budget because DIY projects can get expensive! Here's my list for this year.
Half Bath Makeover
Finish LVP install
Refinish stairs
Declutter and organize my spaces

As I began to plan my half bath makeover, I started to notice signs of hard water damage. After doing some research I found Leaf Home Water Solutions, a trusted partner in providing homeowners and their families safety, enjoyment, convenience, and peace of mind through innovative, professionally installed solutions that protect the condition and grow the value of their homes.
As a first time homeowner I didn't realize there were so many issues that can impact your home and health. Here are a few
Cloudy water | Hard water | Sediment | Rusty Water | Lead | Contamination

Leaf Home Water Solutions 4 step process makes finding the best water solution for your home so easy
Schedule: Complete their survey for a FREE at home water test.
Test: Consultant will come test your water and review your results
Plan: Determine which treatment best meets your needs for your home
Install: Quick and convenient professional installation
Ready to determine what's in your water? Click here to get your FREE water test!
Disclaimer: This blog post is sponsored by Leaf Home. While the views expressed herein are my own and based on personal experience or research, I want to be transparent about my partnership with Leaf Home. I only collaborate with brands that align with my values and that I believe can bring value to our audience. Thank you for supporting the brands that support me!

My new favorite project!
After being in my home for 2 years I finally started my biggest transformation to date.
My guest bedroom.
My friends have been sleeping on an air mattress since I moved in. But after 4 months of work I may like my guest room more than my master suite. Here is the run down of everything I did to make this transformation come to life.
Every project starts with a vision! I really wanted to improve my design skills with this project and creating this mood board in canva allowed me to get creative.
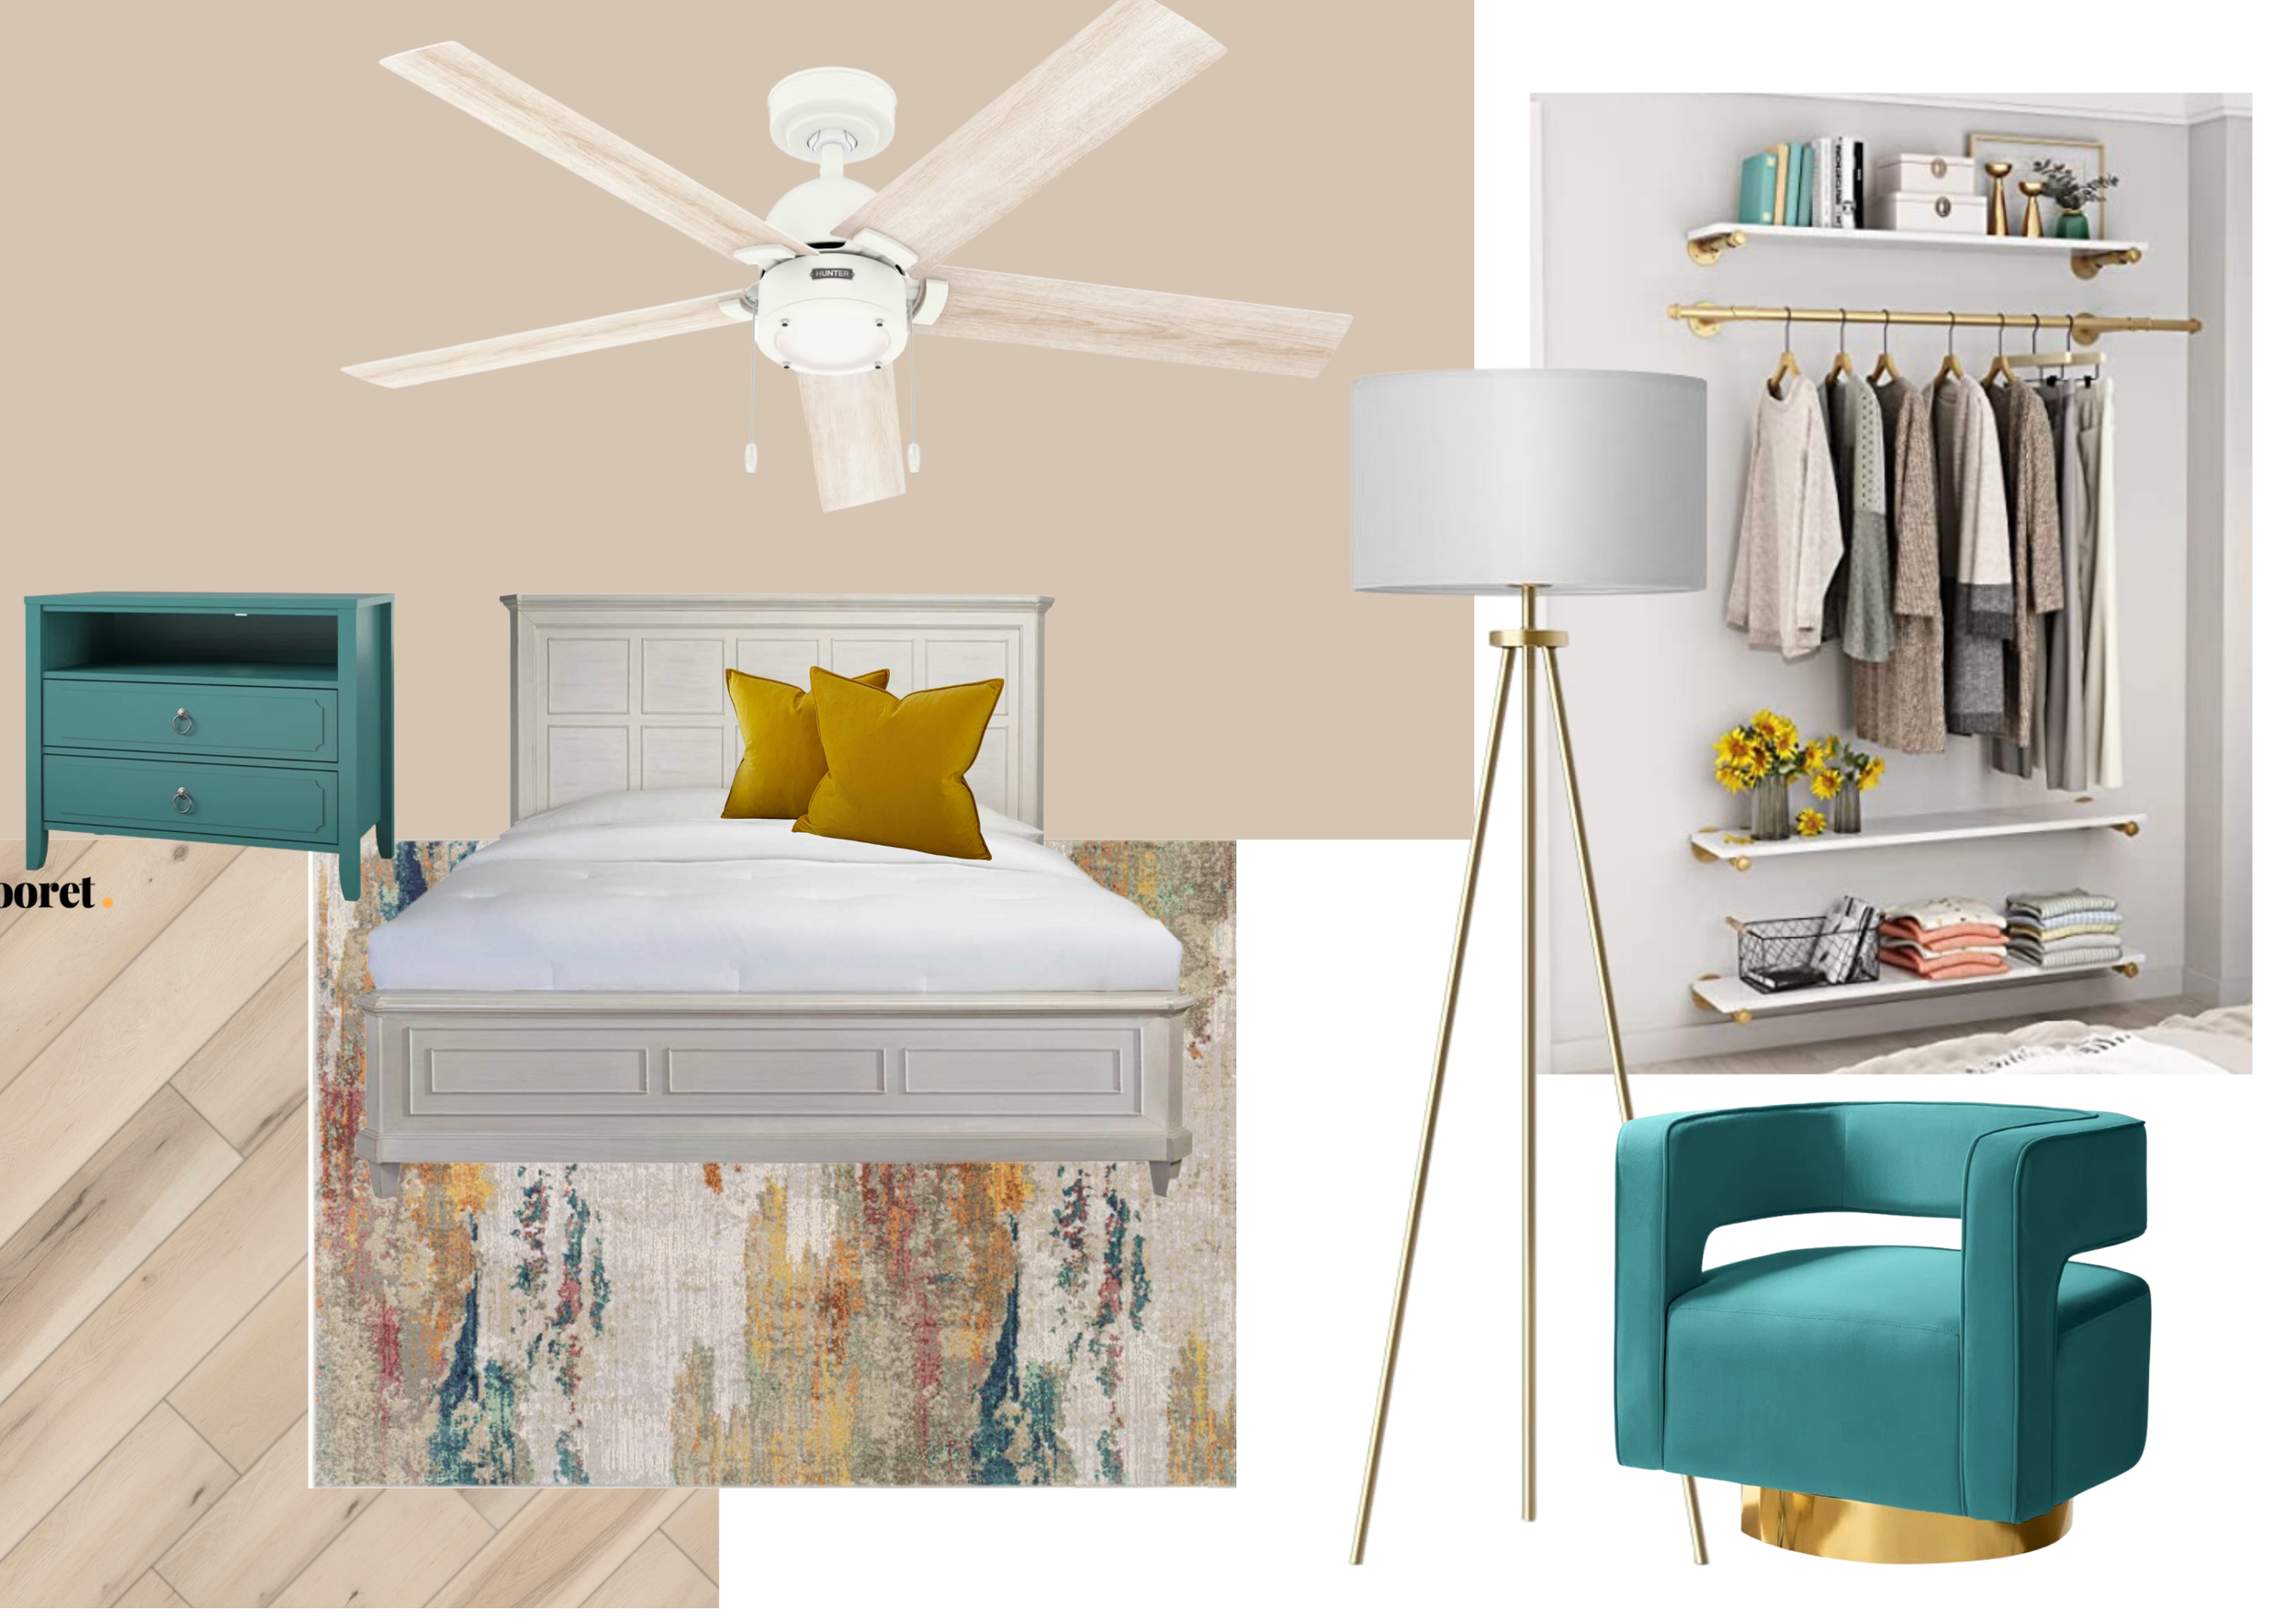
A lot of firsts for this project
-Removing the popcorn ceiling
-Replacing the ceiling fan (I am in love with the new Erling fan by Hunter Fan Company)
-A fresh coat of paint (Sand Dollar by Sherwin Williams)
-Removed carpet and installed new LVP flooring (Palka Base by Flooret)
-Updated baseboard trim and door casing
Proud is an understatement when it comes to this transformation. Head over to my YouTube to check out the full tutorials for this project. If you wanna shop my guest bedroom, check out my LTK shop
Now that the guest room is complete I'm thinking the guest bathroom is up next!
Good luck DIYing!


Disclaimer: The opinions expressed in this blog post are solely mine, reflecting my personal experiences and views. Please be aware that affiliate links have been incorporated into the content, which means I may earn a commission if you make a purchase through those links. Your support through these affiliate links helps sustain the blog and its content.
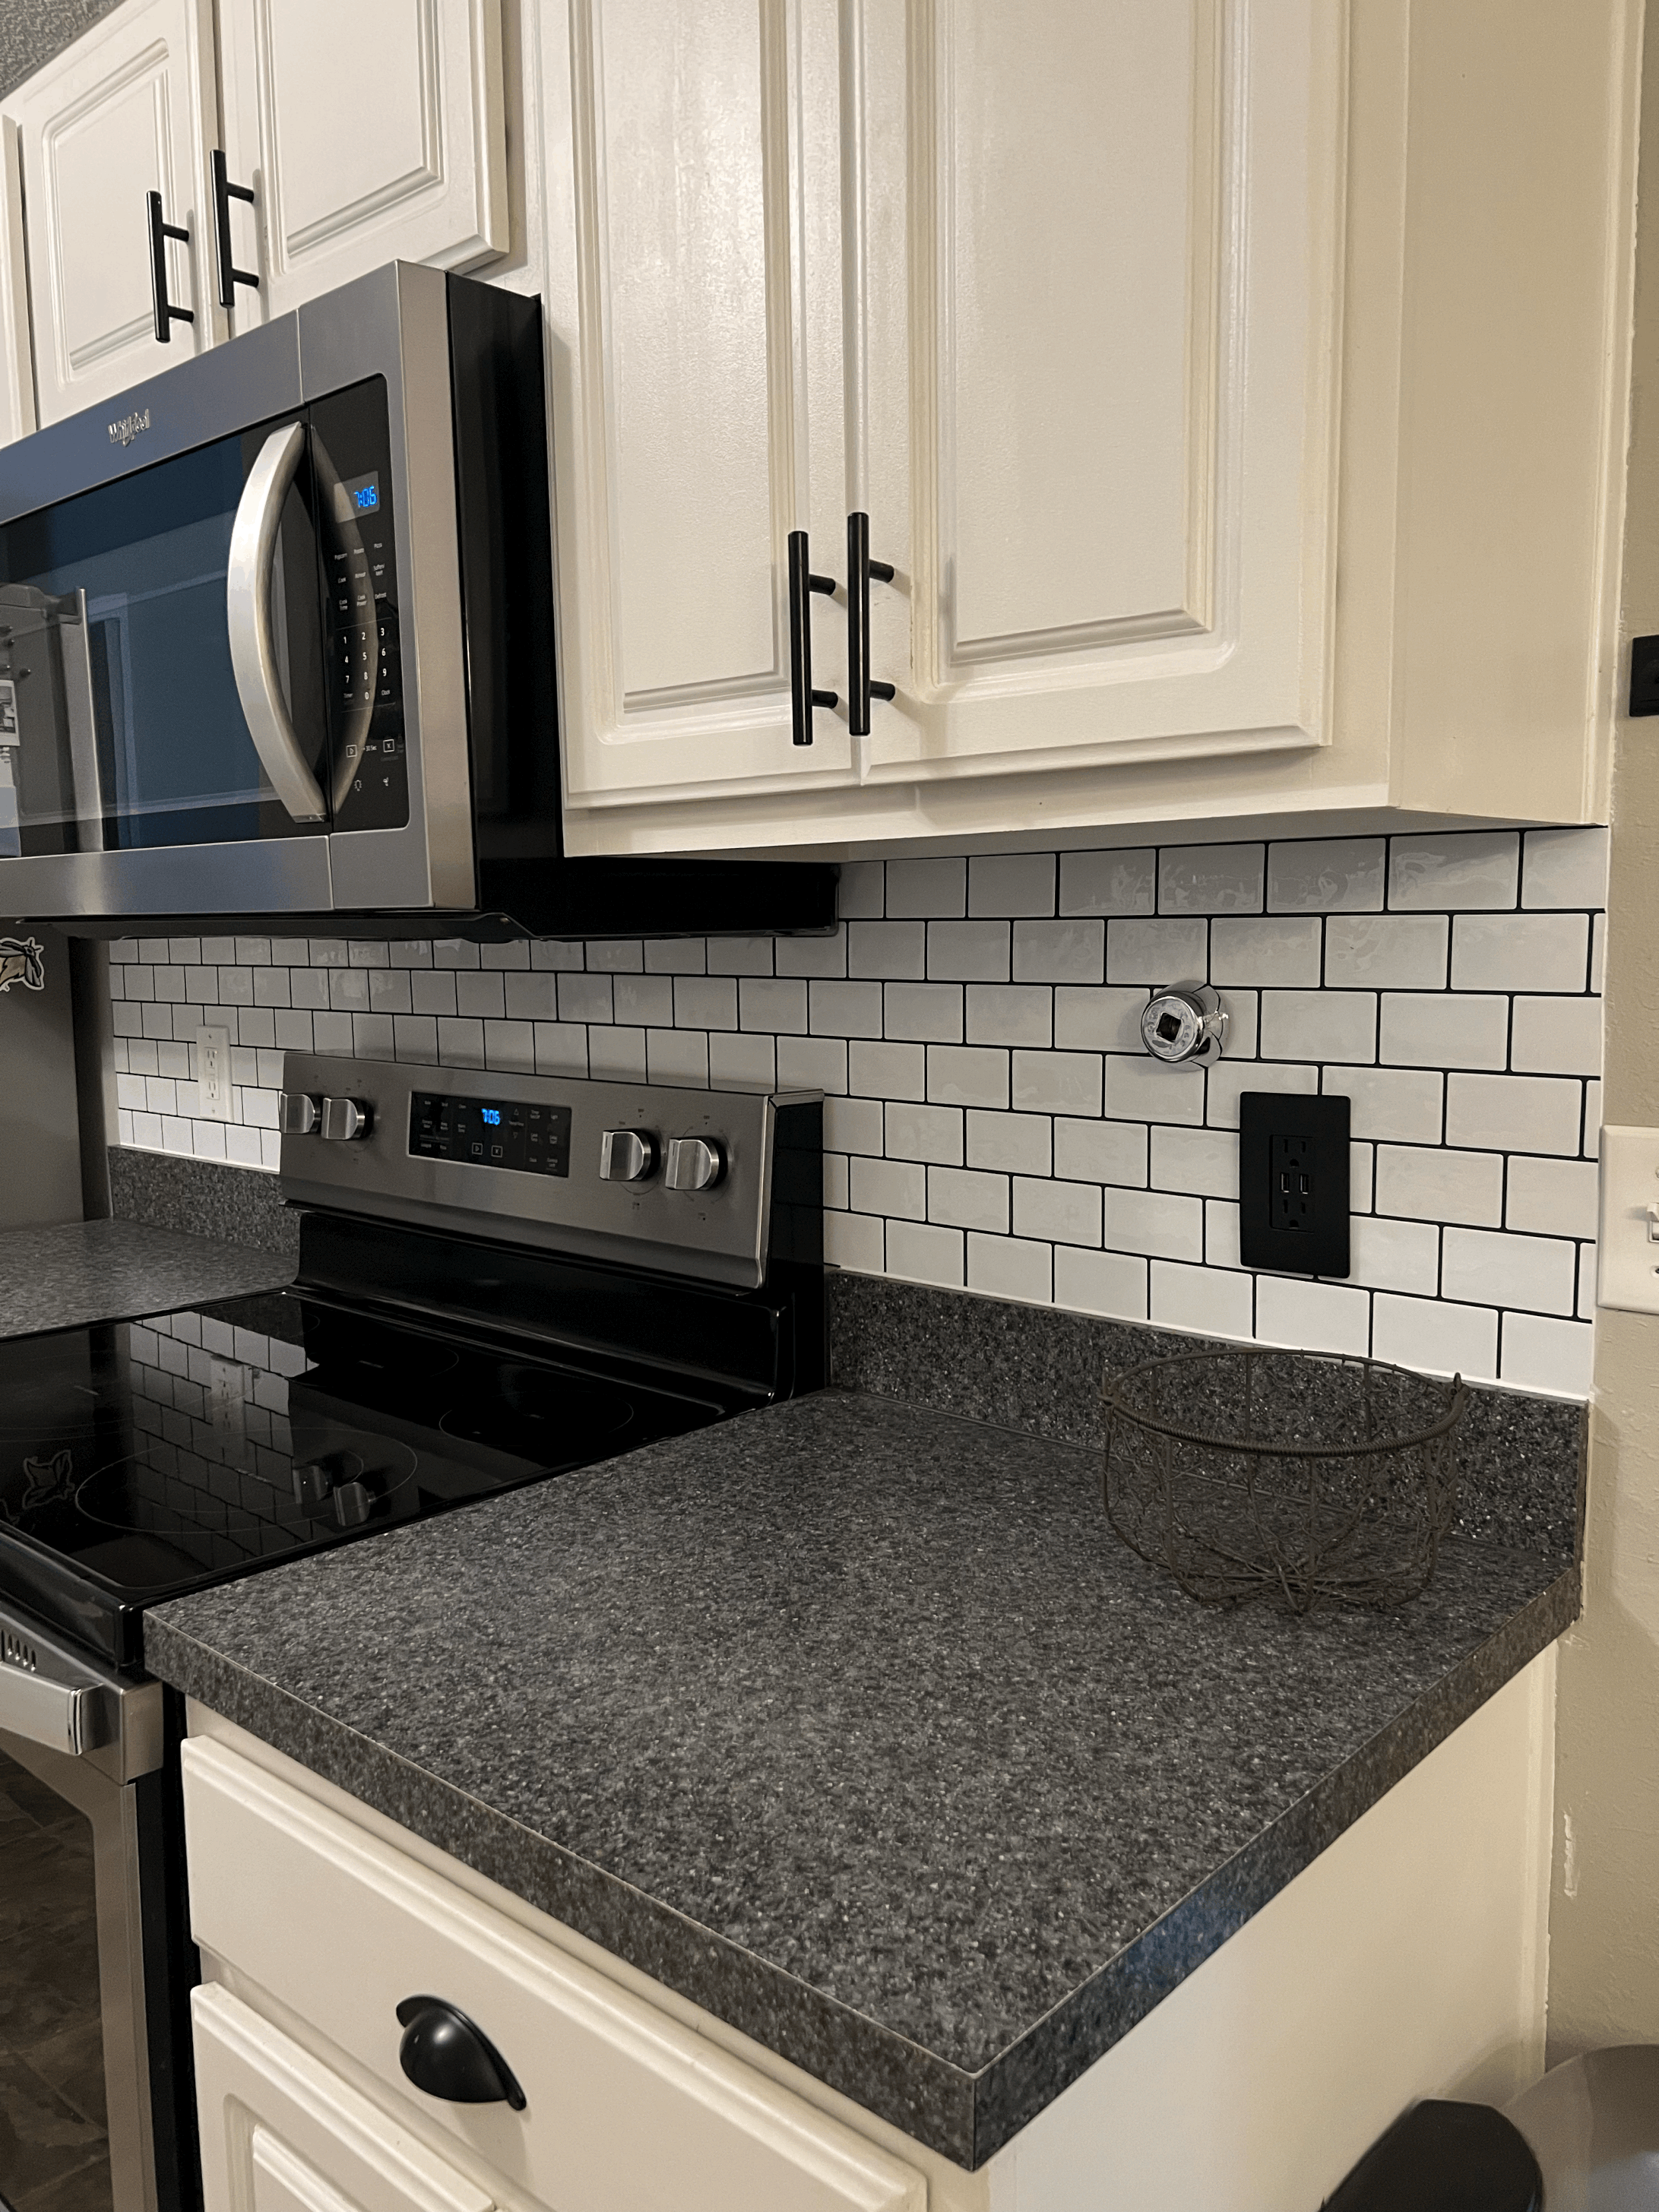
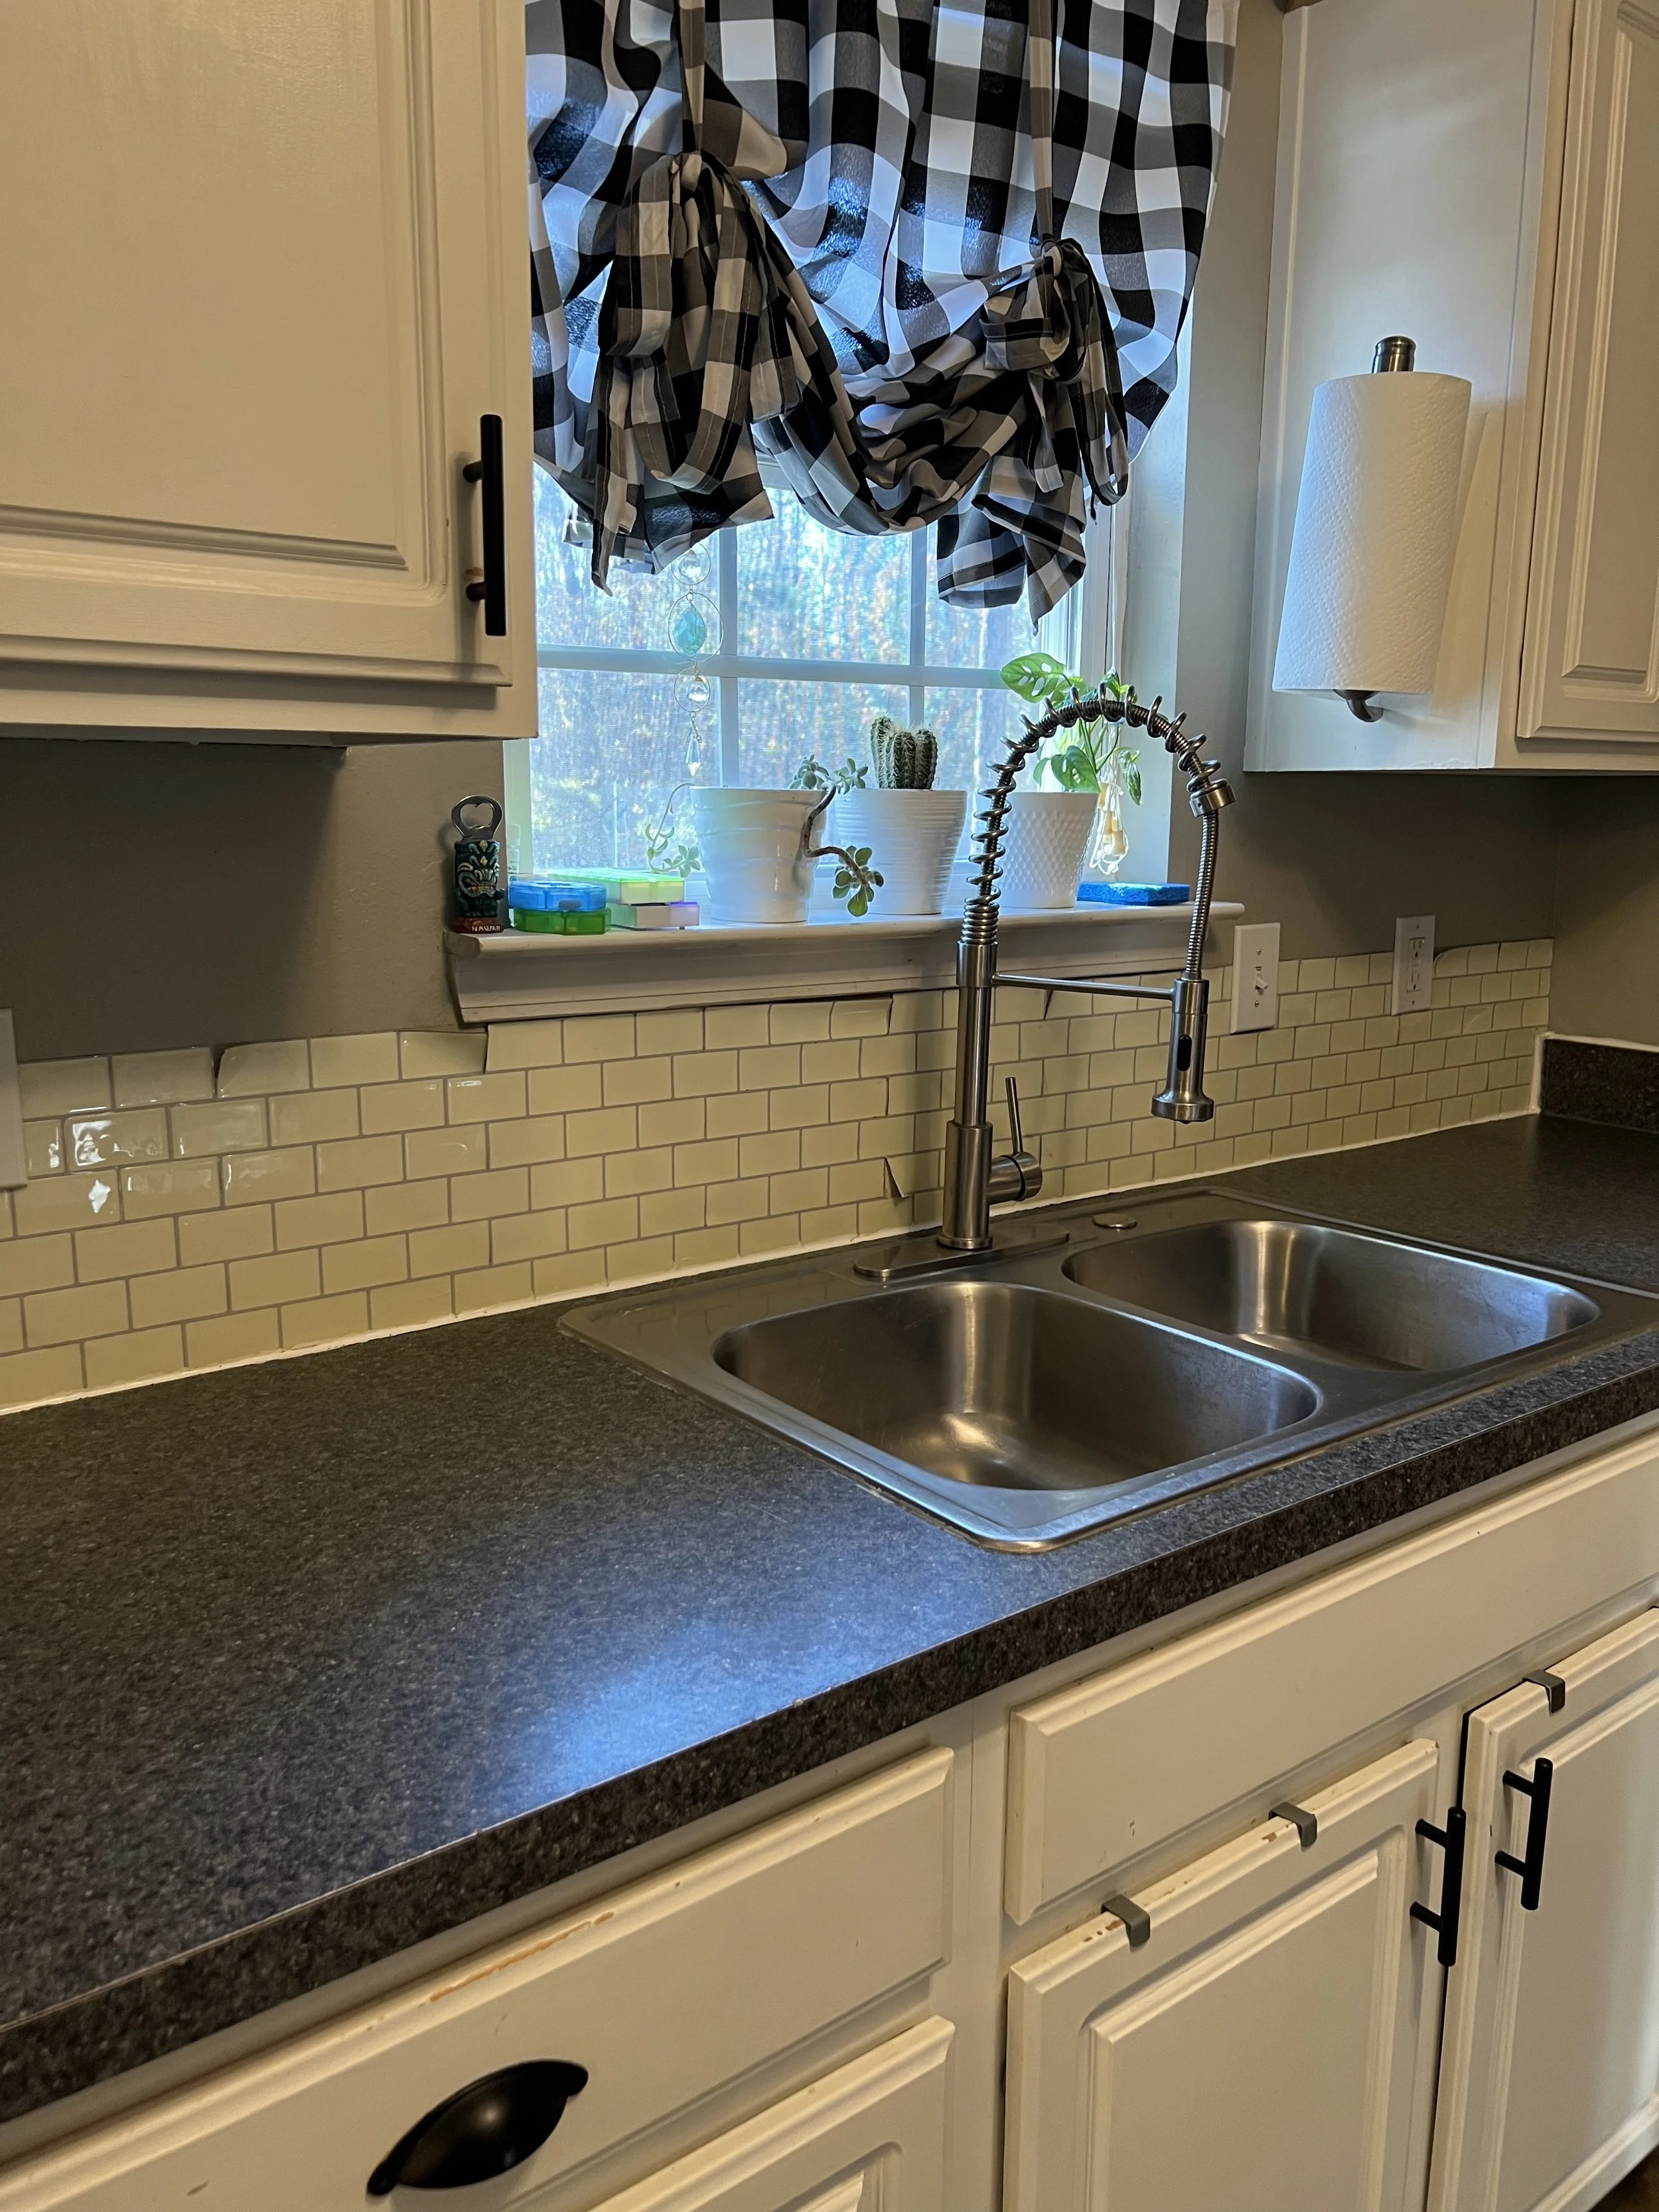
The Magic of Stick and Peel Backsplash! A guide to choosing, installing, and perfecting your DIY kitchen upgrade
Affordable Kitchen Upgrade: Stick and Peel Backsplash
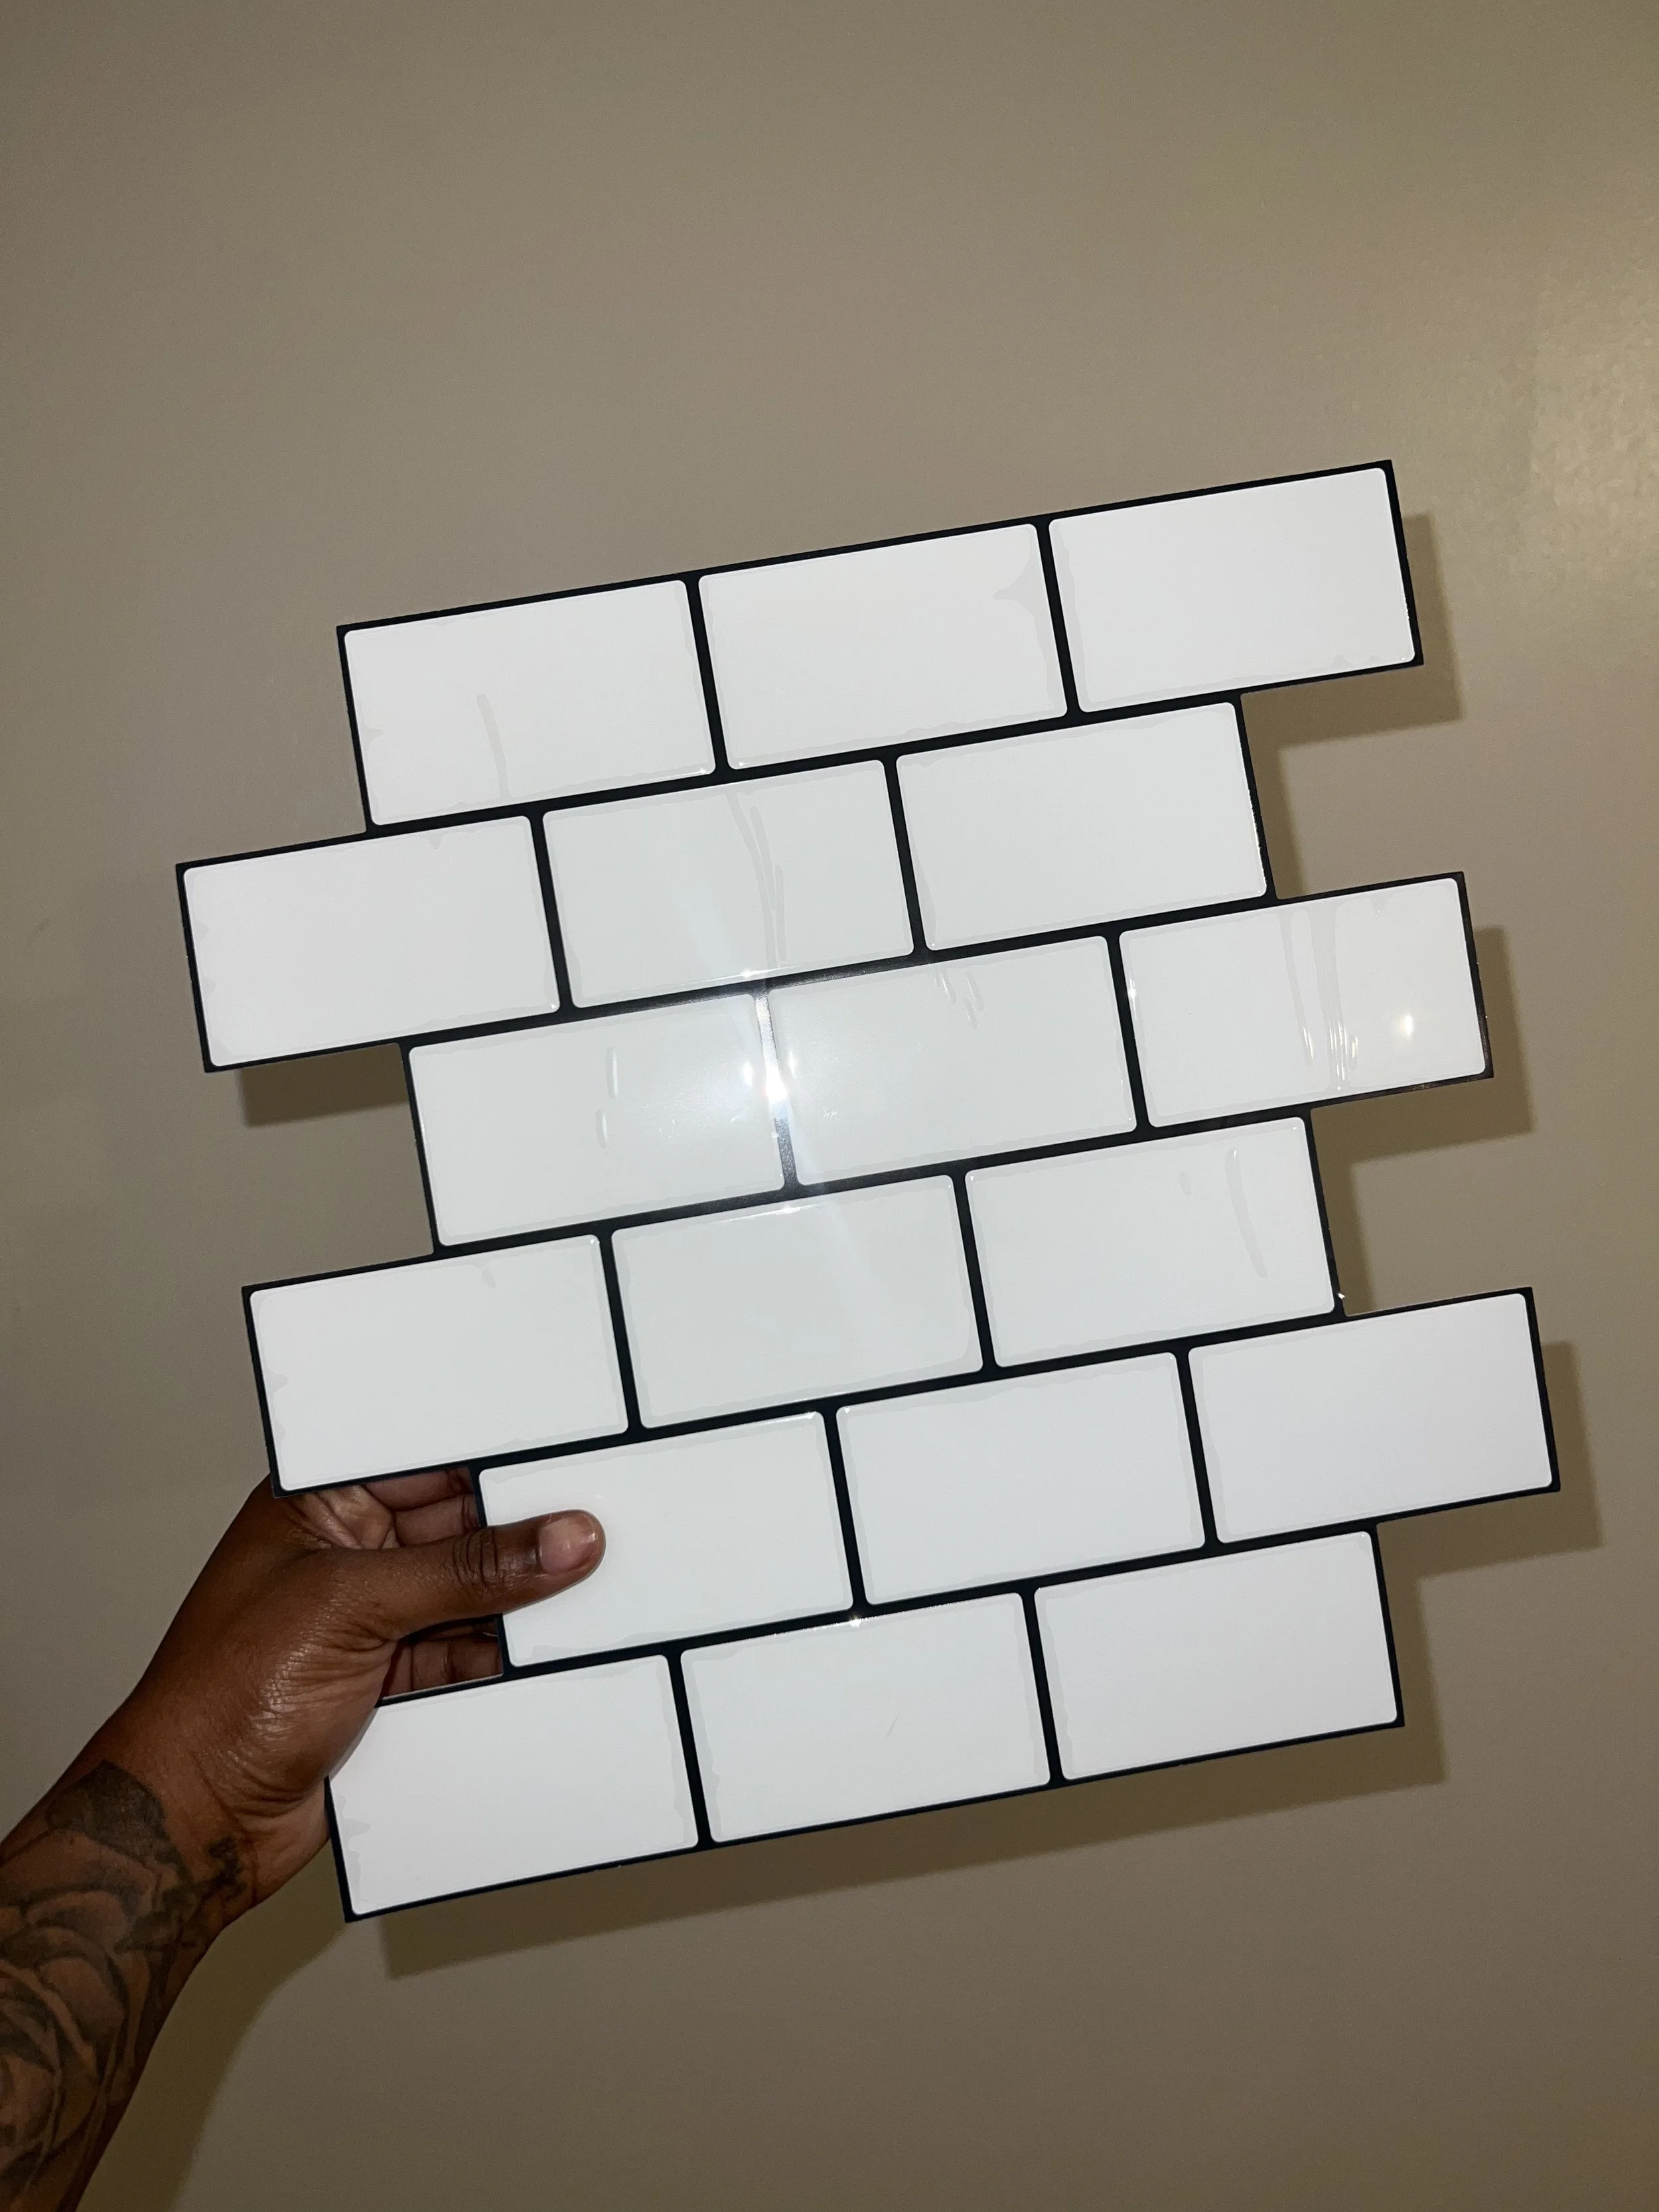
Are you looking to upgrade your kitchen on a budget? The solution is…stick and peel backsplash. This allows you to get the look of tile without the cost and labor! At this point I've done 3 stick and peel applications and I wanna talk to you about what I've learned.
Choosing the right backsplash
When it comes to choosing the right back stick and peel backsplash, the most important thing to consider for me is the thickness of the adhesive tiles. The tiles that I have experience with have been 2.5 mm thick. The increased thickness allows for easier installation and more durability from the finished product. Other things to consider
-Tiles that fit together like actual tiles for a more realistic look
-Strong adhesive
-Easy to clean
-Water and heat resistant
-And you can't forget aesthetic
Choosing a back splash that accents your space (countertops, paint color) is very important to the finished look of the project.
-Tape measure
-Marker
-Rubber Roller
-Box cutter
-Straight edge OR Paper cutter
-Kitchen and Bath Caulk and Caulking Gun
Prep Work
-Measure the space
-Gently sand textured walls
-Clean walls and allow to fully dry
Application Tips
-When it's finally time for install I like to fit a very pieces into place before adhering them to the wall.
-Use a box cutter to cut around any electrical outlets. Be sure to not cut too large of an area of the edges will be able to be seen around the electrical outlet.
-Caulk around the edges after application is complete
Good luck DIYing!

Disclaimer: The opinions expressed in this blog post are solely mine, reflecting my personal experiences and views. Please be aware that affiliate links have been incorporated into the content, which means I may earn a commission if you make a purchase through those links. Your support through these affiliate links helps sustain the blog and its content.